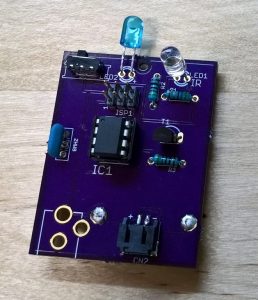
 I’ve now built two boards with my OSH Park PCBs, and have been running them successfully for four days now. At the moment, it’s an experiment to see how long the batteries will last in production. If it’s acceptable, I’ll think about making a new, smaller board with only the necessary parts. I’m also already thinking about ways I could possibly improve the device. But I may just leave it as-is, since it is a simple, and effective solution.
Here are the current instructions (also available on GitHub):
Building
Prerequisites for “happy path”:
- Raspberry Pi configured with BCM SPI enabled
- AVR-GCC installed
- Easiest way to get this is ‘sudo apt-get install arduino’
- Jumpers to wire SPI bus of Raspberry Pi to the ISP pins on the finished board
Steps
Hardware
- Order a board based on the files in https://github.com/Petezah/roomba_wall_v2/tree/master/hardware/roomba_wall_v2
- Alternately, order one directly from OSH Park here: https://oshpark.com/shared_projects/zFWYzgg5
- Purchase parts from Mouser electronics using the current BOM
- Use the ones with “mouser” in their filenames
- NB: The DC jack in the current BOM is incorrect
- Assemble the board–parts are all marked on the silkscreen
Firmware
- Hook up the ISP pins on the assembled board to your Raspberry PI as follows:
- ISP Pin 1 –> Raspberry Pi Pin 21 (MISO)
- ISP Pin 2 –> Raspberry Pi Pin 17 (3.3V)
- ISP Pin 3 –> Raspberry Pi Pin 23 (SCK)
- ISP Pin 4 –> Raspberry Pi Pin 19 (MOSI)
- ISP Pin 5 –> Raspberry Pi Pin 15 (GPIO22)
- ISP Pin 6 –> Raspberry Pi Pin 25 (GND)
- Execute the following on the Raspberry Pi command line
- cd firmware
- make fuse
- make install
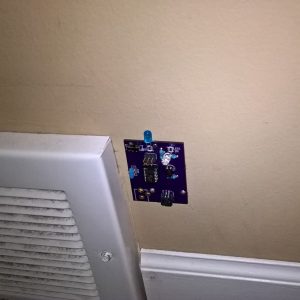
 This is a picture of the intended use. The current PCB has a drill-hole in the top-center which fits a tiny finishing nail or wire brad perfectly. Pre-nail the wire brad, and slide it through the hole in the board and into the wall (or whatever surface you are using). Slide the switch to the “on” position when you use your Roomba, and back to “off” when finished, to preserve battery life.

Saw this on the OSHPark blog. Very nice. Have you considered an SMD version of the project? If you can fit your code in 4k of flash instead of 8, there is an SSOP footprint ATTiny45 – it’s very small. I suspect you could pack the whole thing with a boost converter (run it from a single AA or AAA cell) and an SMD IR emitter in about a square inch.
Thanks! The 85 is definitely overkill here–the program fits under 2k at the moment–but I haven’t yet invested in the necessary tools for SMD work, and can’t justify the cost right now. Plus I sort of enjoy through-hole work. 🙂 I wonder about the tiny IR emitter though–the Roomba is just not that sensitive, as it turns out. If it were bright enough, it might work though.