AVR Roomba Virtual Wall Prototype (part 2)

Breadboard ATTiny virtual wallContinuing the experiment from last time, next up I needed to build  a more real prototype using the actual ATTiny85 chip. I wanted the firmware to be buildable outside of the Arduino environment, ideally inside of Atmel Studio as well as using a Makefile on the command line. This involved stripping the code down to bare AVR register manipulation. I initially wanted to just use the built-in 8 Mhz oscillator on the chip, but based on a clue from the TV-Be-Gone Kit project, discovered a bit later, I found the reason my new prototype was not working was because the internal oscillator is not quite stable enough. So I used an 8 Mhz ceramic resonator. The TV-Be-Gone project’s help also allowed me to strip the complicated timing code from my project. The result is now on GitHub.

Diagram of the breadboard layout
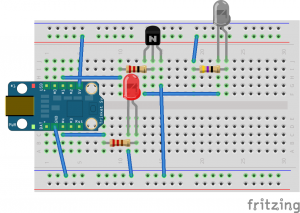
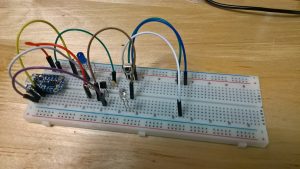
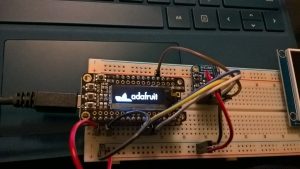
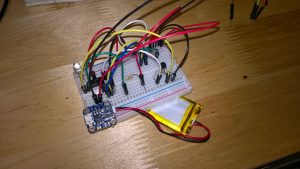
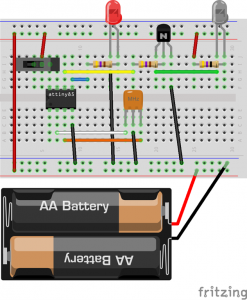
There are a couple other additions here versus the original breadboard prototype.  One is the addition of a slide switch from the positive bus to the VCC pin on the ATTiny85, and the other is an actual dedicated power supply attached to the power bus.  Astute observers will note that this is not the same as the photo above; that is merely because the LiPoly battery is just what I happen to have on hand currently.  I put the AA battery holder into the drawing because those are cheaper and more readily available.

This prototype was also successful.  When tested on the Roomba, the vacuum turns around at the proper time, as expected.  Now I intend to build a new prototype on an actual PCB.

AVR Roomba Virtual Wall Prototype

Shortly after we bought our Roomba, it became clear that the virtual wall idea is truly useful.  However, there are a few flaws with the one that comes with the vacuum: the device is rather large, it doesn’t sit in a very stable way on carpet, and it is generally too easy to move—mainly because of the prior two issues.  Therefore I immediately began thinking about building an alternate version of the device.  It would have two main features:

  1. It must be as small as possible
  2. It must be easy to wall-mount

These made me think of the ATTiny85.  It is both small and cheap, and comes in a DIP package that would be easy to solder.  These days, I like to test my initial ideas out on the Adafruit Trinket, and I build my first prototype with that.  The code is on GitHub, and the assembly pictures are below.

This has no dedicated power supply because it relies on the +5V coming from the Trinket.  Also notice that there is an IR receiver and a few more jumpers on the actual breadboard in the photo.  That is from an additional test sketch that I was running on a separate MCU board to test the actual transmissions that were coming off of the IR LED.  Testing this circuit on the Roomba proved successful.  Initially, I had too large of a resistor on my IR LED, and the signal was too weak.  But with the 51 ohm resistor, it has a range of a little over two feet, which is more than enough.

Next up was building a more real prototype using the actual ATTiny85 chip. I’ll talk about that in my next entry.

Sunlight Sensor

We have a bunch of spots around our house where the previous owner had planted something, and for one reason or another, the plants are now dead.  Not wanting to make the same mistake, I decided to make something useful out of the little IoT kit that I received at Build.  It has been in a sort of planning phase for a while now (mostly while we wait for Winter to defrost); so I already had a few more of the components on hand and on order.

WP_20160425_15_26_00_Pro.jpgAfter testing out a simple photo resistor that I already had, I opted for the log-scale analog light sensor sold on Adafruit.  Rather than forcing me to set the circuit up for a specific light range,  it allows the device to be sensitive from 2-3 lux all the way up to 55000—direct sunlight.  I also went for a waterproof enclosure,  since it will sit outside for long periods of time unattended,  and I don’t want it to get ruined in the elements.  (The enclosure works beautifully, by the way—it rained for the first three days I had it outside, and I had no issues.)

5929622F-4DA3-497F-9A1A-73DF7FAC1CD3.jpgI went with Adafruit.Io for my data logging, and initial data seemed promising.  I also decided to log the battery output voltage to try to monitor the life of the device, as well as to log a data point whenever the device had to reset itself.  I setup the watchdog timer, because initial versions appeared to lock up.  Plus, resetting manually is kind of a pain when you’re using a waterproof enclosure.

Untitled-picture.pngAfter a little iterating, it seems like it is giving me useful data.  Here you can see the device in three different areas over the course of three days—the first area getting full sun for maybe two to three hours, and the third not really getting much sun at all.  Eventually I may clean my code up and release it, in case anyone else finds this useful.

Azure IoT Kit

WP_20160405_15_57_12_Pro.jpgI received one of these fun kits this year at Build 2016.  Here is the link, in case anyone is curious or wants to buy one.  It contains Adafruit’s custom ARM M0 SAMD board (similar to the Arduino Zero, but much smaller), and a bunch of components to mess around with on it.  Anyway, I figured that since the Azure guys (essentially) gave me the kit, I should use it to run through their tutorial.

WP_20160409_19_44_55_Pro.jpgAfter getting the graphics test running with the OLED Featherwing board, I ran through their Azure IoT Hub tutorial.  (Also pictured here is the temperature, pressure, and humidity sensor.)  NB: Make sure to follow the steps explicitly—the tutorial requires at least one forked version of a library that’s already available on the normal Arduino library manager.  Plus check to see if you have at least Arduino 1.6.8, which was just released in March.  I had an older one, because I was unaware of this fact.

azureIotOutput.jpgHuzzah, data!  The spike pictured here is me breathing on the humidity sensor.  Later, I discovered that the standard Azure setup they had me use for this tutorial would have run me out of credits in about three more days; so I removed it!  Alas.  Maybe there will be less pricey tiers later on.  It was fun to try out though.

Inexpensive TFT

On and off, I’ve been working on a project to build a learning toy for my son.  It started out in various forms, but is now destined to become embedded within an old PS/2 keyboard I’ve had lying around unused for a good while (except as an occasional toddler plaything).  At any rate, I needed a display of some sort to permanently embed in the project, and since it will likely take a beating over time, I wanted it to be fairly inexpensive.  I ended up finding this device on Amazon, and finally received it last week.

d

Using Adafruit’s ST7735 library, it works perfectly.  Thanks to the blog post here, I was able to set it up fairly easily.  Here, you can see it hooked up to my Adafruit Pro Trinket.  The only addition I had to make was to insert a LD33CV 3.3V voltage regulator between the Trinket’s power supply and the bread board’s power bus.  The product claims that it has a built-in level shifter, but the data sheets  have conflicting information about this.  Better safe than sorry.  Once the project is more complete, I plan on swapping the Trinket out for a dedicated ATMega328P, and will give it a lower voltage power supply also.

MoonMen, now for Windows and Windows Phone

I finally was able to spend the time necessary to get my engine for MoonMen running on both Windows and Windows Phone.  It is now a universal app, published in both stores!  At some point I may make a post on things I discovered during the conversion process that made it possible; but for now, I’m just posting the news.  Also, now that the projects are upgraded, I can start doing some other things that I hadn’t been able to do, which is also exciting.

Random Award

While trying to do some maintenance in my email today, I discovered that I magically had access to my outlook.com webmail inbox again.  It had previously been blocked from working because of a weird account mixup that most people will likely not run into involving my Microsoft account and my O365 account.  At any rate, I (sort of) accidentally got into it today and discovered a funny email informing me that BlarghPad had been awarded some editor’s choice award.  See here if you are bold: http://bestwindows8apps.net/blarghpad/  It is clearly not a completely legit review site; but I was amused nonetheless.  Not every app on the site (which probably just web crawls the Windows Store at random) has an Editor’s Choice award. 🙂

Scintillator, a new particle tool

In small increments of free time, I’ve been building another new engine, this time based natively in DirectX 11, targeting native WinRT for Windows 8 and Windows Phone.  In the process, I’ve found that I need yet another tool to help me make particle effects (ever one of the best bang-for-buck programmer art solutions); and to that end, I’ve decided to make a tool out of the state of my engine thus far, with a WinRT XAML interface on top, and release it to the app store.  It’s a work in progress, and will obtain more features as needed and as I have time to work on them, but I wanted to at least get it to a state where I could release something.  Now that that hurdle is overcome, updates may come more frequently for it.

Visit the info page

Get Scintillator from the Windows Store